# Item library
## Customizing object types for your Workplace
The \[**Item library**] section in the \[**Workplace settings**] module is your go-to in Timebook for customizing your object types for the entire Workplace[^1]. Here, you can modify properties of various objects, including [Work Item](https://help.timebook.ai/hc/product-guide/core-concepts-and-objects/delivery-objects/work-item) types, [Tickets](https://help.timebook.ai/hc/product-guide/core-concepts-and-objects/research-and-planning-objects/ticket), [Goals](https://help.timebook.ai/hc/product-guide/core-concepts-and-objects/strategy-objects/goal), and [Opportunities](https://help.timebook.ai/hc/product-guide/core-concepts-and-objects/research-and-planning-objects/opportunity). By defining which properties each type should contain—such as Status, Assignee, Priority, or more complex attributes—you shape object cards to display the exact information you need, streamlining your workflow.
In Timebook, you can work with the default object types we designed for you. These are based on well-known concepts in product management, ensuring a solid starting point. However, with the \[**Item library**] section, you can customize their details to align with your unique work style.
{% hint style="warning" %}
Only the Workplace Owner and Admins can access the options in the \[**Item library**] section.
{% endhint %}
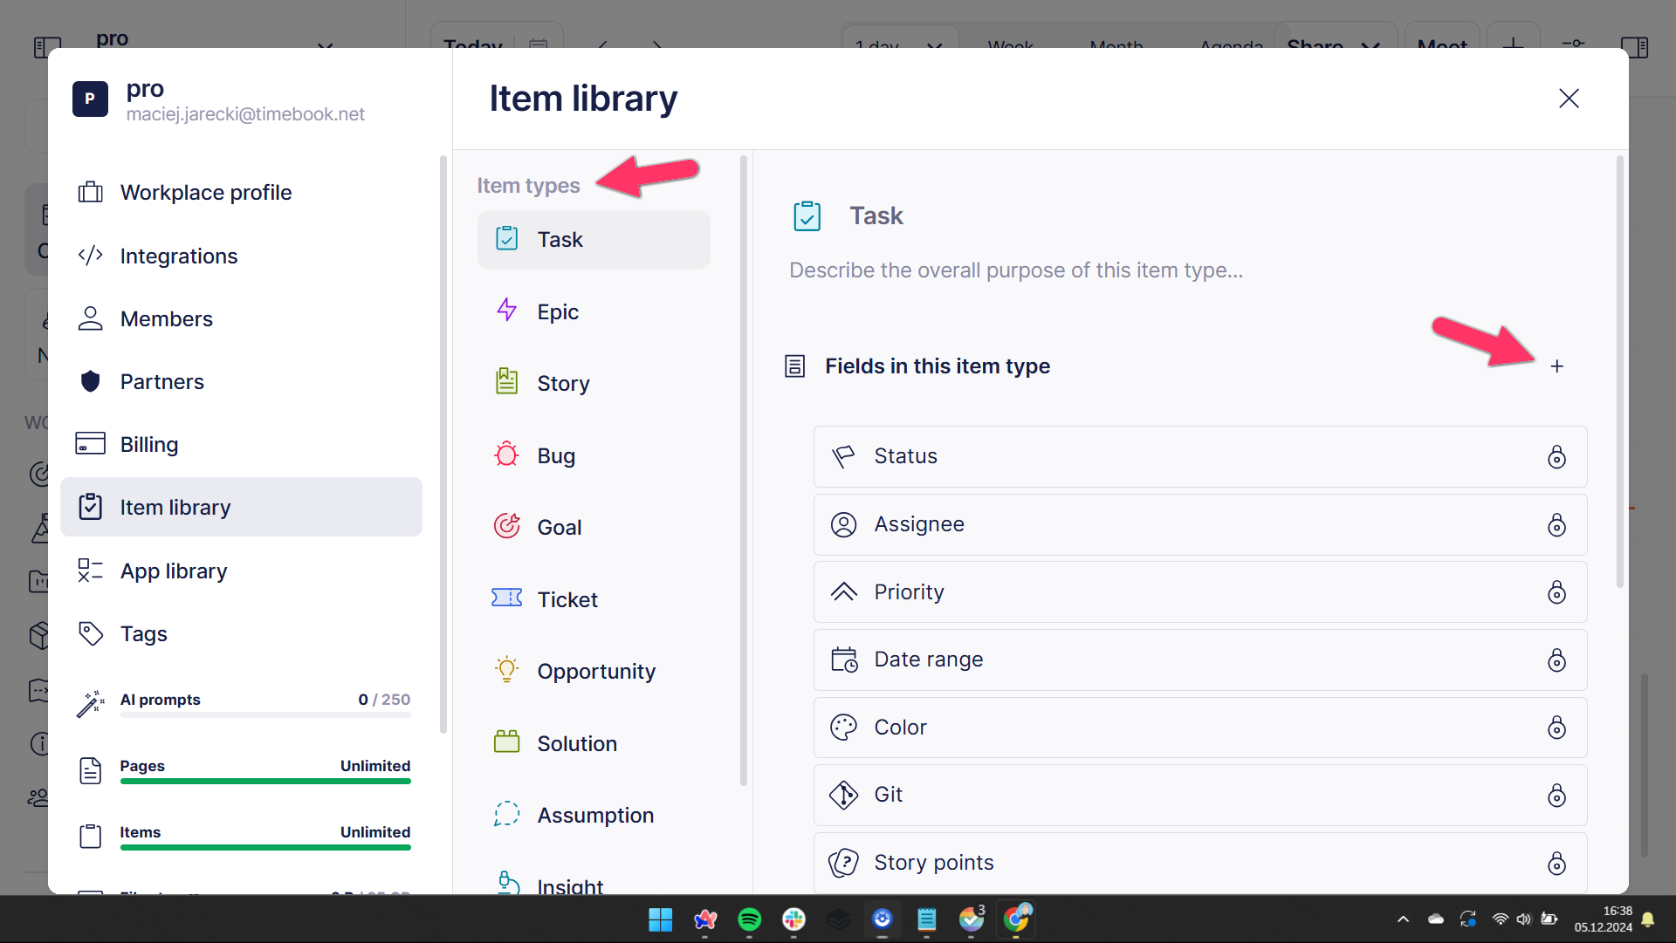
Options available in the [Item library] section of [Workplace settings].
{% hint style="info" %}
To access this section:
1. Click the dropdown next to the name of your Workplace in the top-left corner.
2. From the menu, select \[**Workplace settings**].
3. Open the \[**Item library**] section.
{% endhint %}
***
## Editing an object type
The left pane in \[**Item library**] displays a list of all editable Timebook object types. Selecting an object type shows all its properties in the main working area on the right. This area provides all the tools you need to customize properties, ensuring each object type meets the specific needs of your workflow.
{% hint style="info" %}
We have a dedicated article explaining Timebook system properties.
For more information, see [properties](https://help.timebook.ai/hc/product-guide/using-features-and-workflows/properties "mention")
{% endhint %}
To customize your object types, use the dedicated \[**+**] button located to the right. You’ll then have two options:
* \[**Select from library**]: Choose from predefined Timebook system properties.
* \[**Create using editor**]: Build a custom property tailored to your needs. The editor offers a variety of templates, including (but not limited to) single select, multi select, date, and number.
{% embed url="" %}
You can add properties from the system library or create them using a simple editor.
{% endembed %}
Once you’ve added all the properties you need for your object type, you can further refine and organize them:
* **Rearrange properties:** Drag properties using their handles on the left to change their position in the list. This order determines how properties are displayed on all object cards of this type across the app.
* **Remove properties:** Click the \[**...**] menu on a property and select \[**Remove**] to stop showing it in the object type. This action also hides the property on all existing object cards of this type.
* **Edit properties:** Click on a property to update its values, name, or description. Note that Timebook system properties, marked with a lock icon, cannot be edited.
Remember to press \[**Save**] to confirm your changes. Once saved, we will automatically update the appearance of all objects of this type already in the system to reflect your adjustments.
{% hint style="info" %}
In the \[**Item library**], you can also enable **sections** for object types. Unlike properties, sections appear on the left side of an object card, making them a key part of the card’s structure.
To enable a section, click **\[Add a section]** and select from the available options. For example, you can enable the [Key Results](https://help.timebook.ai/hc/product-guide/core-concepts-and-objects/strategy-objects/goal#what-are-key-results) section on your Goal cards to give more attention to this important feature.
{% endhint %}
***
## Related articles
[](https://help.timebook.ai/hc/settings/workplace-settings "mention")
[properties](https://help.timebook.ai/hc/product-guide/using-features-and-workflows/properties "mention")
[timebook-objects](https://help.timebook.ai/hc/product-guide/core-concepts-and-objects/timebook-objects "mention")
[^1]: Just like your actual organization, Timebook **Workplace** brings everyone under one virtual roof, keeping things structured and in sync. The Workplace consists of Teams collaborating on shared resources. For more information, see [workplace-navigation](https://help.timebook.ai/hc/product-guide/getting-around-timebook/app-navigation/workplace-navigation "mention")